4. How to add product categories to your store in PrestaShop
Categories can be used to group similar products together making it easier for customers to find them.
1) To create a category, go to Catalog.
2) Click Add a new subcategory.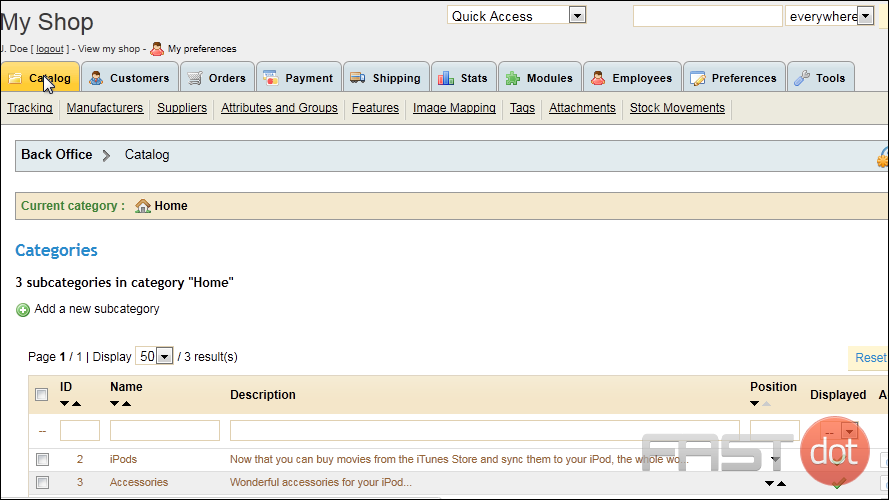
3) Enter a name for the category.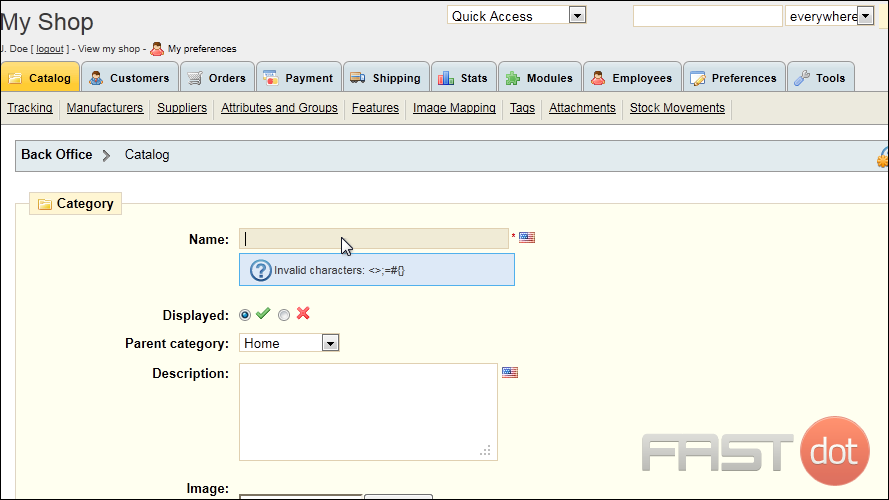
4) Optionally select a Parent Category.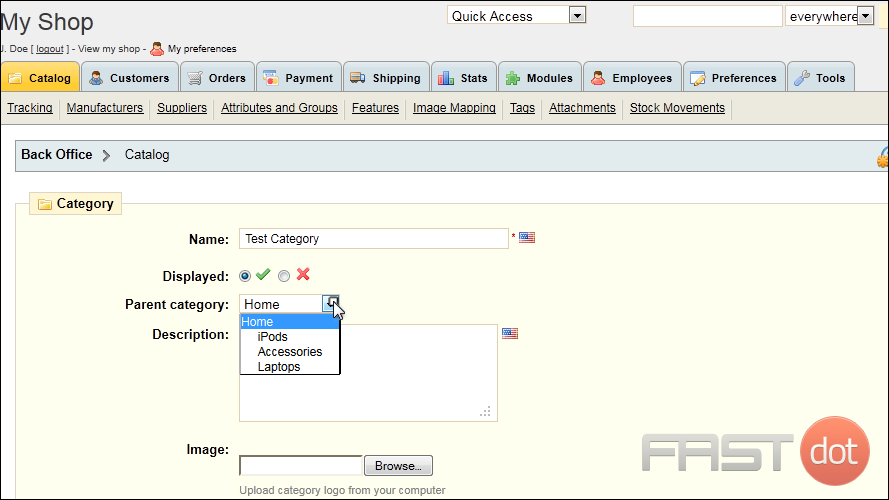
5) Type the Description here.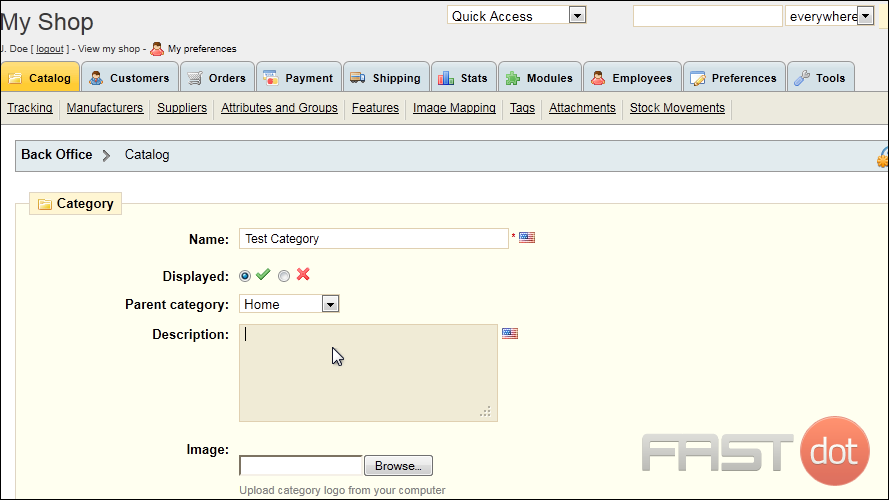
6) Click Save.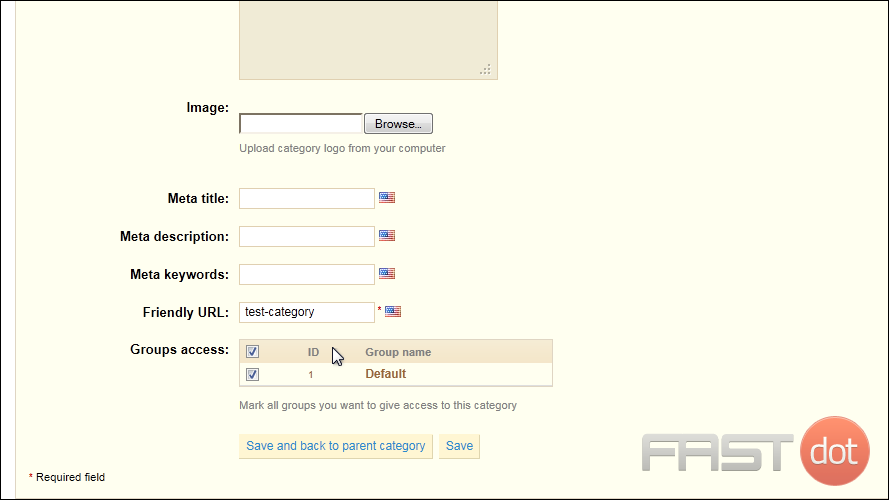
That’s it! Now you know how to add product categories in PrestaShop.
How to Add Product Categories to Your Store in PrestaShop
Step 1: Access the Categories Section
- Log in to your PrestaShop admin panel.
- In the left-hand sidebar, navigate to Catalog and then click on Categories.
Step 2: Add a New Category
- Click on the Add new category button at the top right corner.
- You will be taken to a form where you can create the new category.
Step 3: Fill in the Category Information
- Name: Enter the name of the category (e.g., “Men’s Clothing”, “Electronics”).
- Displayed: Choose whether the category is visible to customers. If you’re still working on it, you can leave it disabled and enable it later.
- Parent Category: Select the parent category if this is a subcategory. If this is a main category, select “Home”.
- Description: Provide a description of the category. This can include HTML formatting for better presentation.
- Category Cover Image: Upload an image to represent the category on the category page.
- Meta Title: Enter the meta title for SEO purposes. This is the title that will appear in search engine results.
- Meta Description: Enter a meta description for SEO purposes. This is the brief description that will appear in search engine results.
- Meta Keywords: Add meta keywords for SEO purposes. These are the keywords that describe the content of the category.
- Friendly URL: Specify a user-friendly URL for the category. This should be short and descriptive, using hyphens to separate words.
- Group Access: Choose which customer groups can access this category (e.g., visitors, guests, customers).
Step 4: Save the Category
- Once all the information is filled in, click the Save button at the bottom right corner.
Step 5: Add Products to the Category
- Go to Catalog > Products in the left-hand sidebar.
- Select the product you want to add to a category by clicking on its name.
- In the product’s editing page, navigate to the Associations tab.
- Under the Categories section, check the boxes for the categories to which this product should belong.
- Click Save and Stay to save the changes. Repeat this process for all products you want to add to the new category.
-
BEST Webhosting
Explore a comprehensive array of web hosting services designed to cater to various needs. Whether you’re an individual looking for reliable personal hosting or a business requiring high-performance solutions, BEST Webhosting offers tailored options to ensure optimal website performance, robust security, and 24/7 support.
-
Unveiling the Pillars of Web Hosting
Web hosting is the backbone of a digital presence, providing the infrastructure necessary to publish and maintain websites online. This article delves deep into the essentials of web hosting, guiding individuals and businesses to make informed decisions. Learn about hosting types, server performance, and scalability options to choose the perfect fit for your online goals.
-
Digital Experience and Coding a New Website
Building a website today involves more than creating an online presence; it’s about delivering an exceptional digital experience. This piece explores modern website design principles, user experience strategies, and advanced coding techniques. It highlights how a well-crafted website can effectively convey your brand message, captivate audiences, and drive business success.
-
How to Buy a .com.au Domain: A Buyer’s Guide to .com.au Domains
This guide is a must-read for startups and established businesses aiming to enhance their Australian online presence. Learn the steps to secure a .com.au domain that aligns perfectly with your brand identity. The article provides insights into domain registration requirements, tips for choosing a memorable domain name, and the benefits of a local domain for SEO.
- Incredible Ideas deserve Incredible DomainsWith Rapid Registration, your domain is registered almost instantly, meaning you don’t have to wait to get your business or name online!
-
Edge of Technology, Digital Transformation, and Cloud Computing
Staying competitive in today’s fast-paced digital landscape requires leveraging cutting-edge technologies. This article explores the vital roles of Digital Transformation (DT) and Cloud Computing in modern business strategies. Understand how these technologies drive efficiency, foster innovation, and enable organisations to scale operations seamlessly.
-
The Best WordPress Plugins for Email Marketing to Grow and Engage Your Subscriber List
Email marketing remains a powerful tool for audience engagement and lead conversion. Discover top WordPress plugins like Mailchimp, Constant Contact, OptinMonster, and Thrive Leads. This article provides detailed guidance on creating effective opt-in forms, segmenting email lists, automating campaigns, and tracking metrics for successful email marketing strategies.
-
The Best WordPress Caching Plugins to Optimize Site Speed and Performance
Website speed and performance are crucial for user experience and SEO rankings. This detailed review covers the most effective WordPress caching plugins, including W3 Total Cache, WP Super Cache, WP Rocket, WP Fastest Cache, and LiteSpeed Cache. Learn how these plugins enhance site performance by minimising load times and optimising server resources.
Step 6: Manage Existing Categories
- In the Categories section, you will see a list of all existing categories.
- You can edit a category by clicking on the Edit button (pencil icon) next to the category.
- To delete a category, click on the Delete button (trash icon) next to the category. Confirm the deletion when prompted.
- Use the View button (eye icon) to see how the category looks on the front end of your store.
Additional Tips for Managing Categories
- Hierarchical Organisation: Organise categories in a hierarchical structure for better navigation. For example, “Clothing” as a main category and “Men’s Clothing”, “Women’s Clothing” as subcategories.
- SEO Best Practices: Use relevant keywords in the category name, description, meta title, and meta description to improve search engine rankings.
- Category Images: Use high-quality images for category cover images to enhance the visual appeal of your store.
- Customer Experience: Ensure that categories are intuitive and make sense from a customer’s perspective. Use clear and descriptive names.

